News & Updates


Blog
•
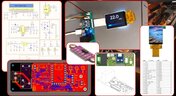
How to Build Your Own Laser Range Finder
In this article we will show you how to create step by step a digital laser range finder for your own. Everything is based on Raspberry Pi board.

Blog
•
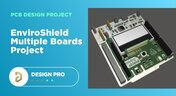
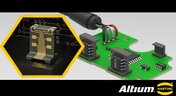
Nucleo Shields Multi-Board Design
Learn how easy it is to create multi-board projects. This practical project article covers the reasons for breaking larger boards into sub-assemblies and explores the various connection options available between sub-assembly boards.
Blog
•
Analog Solar Tracker Project
In this article you can learn about light sensors while building an analog solar panel tracking system. This open-source project covers multi-channel design, window comparators, driving motors, and photosensors.

Blog
•
Concept Phase – Initial CAD Design
We are continuing our journey through the open-source laptop project. This article explains an initialization of CAD design process from the early concept and brainstorming phase.
Blog
•
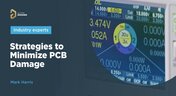
Expert Tips for Safely Powering Up Your New PCB for the First Time
In this blog we will show you the strategies to minimize the risk of damage to circuit boards during the initial power-up process.

Blog
•
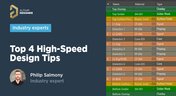
High-Speed PCB Design Tips
Essential tips for high-speed PCB designs, and when you need to start being concerned about how and where you route your traces.

Blog
•
MIDs Make a Comeback as Vertical SMD Modules for Your PCB
If you've ever wanted to mount components vertically, but without the expense of a flex section this article is for you. You can use an MID in your PCB.
Blog
•
Everything You Need to Know about Conformal Coating
Explore the basics of conformal coating with us. Conformal coating is a protective layer applied to electronic circuits to guard against environmental factors such as moisture and dust.
Blog
•
Introduction to Open Source Laptop Project
We have started a very exciting journey into the creation of an open source laptop project. This project will be an ongoing one, with our community able interactively participate. By utilizing Altium 365 users will be able to view, comment on, and download design files. This will be a great learning experience for new and experienced PCB designers.
On-Demand Webinar
•
Benefits of Altium 365 Version Control for Solo Users
Join our insightful webinar on Altium 365 Version Control System (VCS) designed for solo users, where Ari Mahpour will guide you through creating and managing projects on the cloud-based platform.


Blog
•
Happy Holidays!!!
Altium wishes you all the best this holiday season! May this time be filled with joy, laughter, and cherished moments with your family and friends. We also extend our warmest wishes for a Happy New Year 2025!
Blog
•
What Is Wire Harness Design?
Explore our latest article to learn the fundamentals of wire harness design, its key components, and how it ensures organized, efficient, and reliable electrical systems across automotive, aerospace, and medical sectors.
Blog
•
How to Determine Ferrite Bead Circuit Model Parameters
Learn how to accurately determine ferrite bead circuit model parameters for effective noise suppression in high-speed PCB designs. This article explores key concepts, measurement techniques, and practical tips for modeling ferrite beads in your projects.
Blog
•
Mastering EMI Control in PCB Design: How to Choose the Stackup for EMC Design
This article by Dario Fresu, part of the Mastering EMI Control in PCB Design series, explores strategies for selecting PCB stackups to optimize EMC performance. It offers actionable tips for balancing cost, manufacturability, and signal integrity in your designs.

Blog
•
AI Vision with the Kria KV260 Vision AI Starter Kit
Discover AI-driven vision capabilities with the Kria KV260 Vision AI Starter Kit, presented by Ari Mahpour. Ideal for prototyping vision solutions, this kit offers an accessible entry point into advanced AI applications.

Blog
•
Model-Based Systems Engineering in the Era of Digital Twins: A Paradigm Shift in PCB and Electronics Design
Explore how Model-Based Systems Engineering (MBSE) integrates with digital twins to enhance design accuracy, collaboration, and lifecycle management in modern engineering projects. This approach bridges the gap between physical systems and digital models, enabling real-time simulation and optimization.

Blog
•
Wire Bonding in Altium Designer
The Wire Bonding in Altium Designer article highlights how Altium Designer 25’s wire bonding feature streamlines complex designs for advanced assemblies like 3D stacked dies and RF modules. This tool enhances efficiency and precision, catering to modern electronic design needs.
Blog
•
Altium Designer 25: Pioneering Collaboration, Product Development, and Advanced Simulation
Altium Designer 25 introduces groundbreaking features for seamless collaboration and precision in PCB design, from PCB CoDesign to advanced simulation and MCAD tools. Discover how AD25 is transforming electronic product development.

Blog
•
Wire Bonding: Modern Applications, Technology Trends and Cost Considerations
Explore the future of wire bonding, from new applications to cost-saving trends, in this article by Samer Aldhaher. Stay updated on key innovations in this essential connection technology.

Blog
•
Maximizing Efficiency: A Deep Dive into Altium 365 Jira Integration Features
Discover how Altium 365’s Jira integration can streamline collaboration and keep projects running smoothly with real-time design updates and task tracking. Perfect for teams seeking efficiency!

Blog
•
Optimize PCB Design with Integrated BOM and CAD Systems
Discover how integrating BOM management and CAD systems can streamline your PCB design process in this insightful article. Learn how combining these tools enables smoother collaboration, reduces errors, and improves design efficiency, helping you optimize your workflows from concept to manufacturing.
Blog
•
The Essential Guide to Through-Hole Resistors
Resistors are fundamental components in electronic circuits, essential for controlling current and voltage. This article explores their basic principles, types, and key applications, helping you understand their crucial role in electronics.
Blog
•
Avoiding Costly Delays: Essential Tips for PCB Designers
Efficient PCB design is crucial for avoiding costly delays in product development. This article offers practical tips and best practices for PCB designers to streamline their workflows, minimize errors, and ensure timely project completion.

Blog
•
Understanding Signal Reflections for High-Speed Design
Signal integrity is the backbone of high-speed digital systems. In this new article by Rafał Stępień, we break down signal reflections and how to optimize your designs with effective impedance matching techniques.
Blog
•
Mastering EMI Control in PCB Design: Component Placement for EMC
In the second article of the "Mastering EMI Control in PCB Design" series Dario Fresu explores how effective component placement can reduce electromagnetic interference (EMI) in printed circuit boards. He highlights strategies such as board segregation and careful management of high-speed signals and their harmonics to ensure signal integrity and minimize emissions.
Blog
•
Signal Integrity Principles based on Altium Designer 24
Check out this article where Rafał Stępień dives into the essentials of maintaining signal integrity in high-speed digital systems. Discover key techniques like controlling signal reflections, reducing crosstalk, and designing differential pairs in Altium Designer 24 to ensure reliable and efficient PCB performance.


Your search returns no results.