News & Updates

Blog
•
IPC - Vias
Via protection is an important part of modern PCB design. It provides additional benefits in PCB manufacturing and assembly, increasing the number of acceptable products.
On-Demand Webinar
•
Advantages of Using a Version Control System for Your Next Project
Version control systems (VCS) have been around for a long time in the software world but can be surprisingly new to some folks in the electronics design industry. Version control tools are great for tracking and maintaining entire codebases without the old-school copying, pasting, zipping, and emailing steps many PCB designers use.
Blog
•
Power Integrity Analysis in Your PCB Design Software
Power integrity problems can abound in modern PCBs, especially high-speed boards that run with fast edge rates. These systems require precise design of the PDN impedance to ensure stable power is always delivered throughout the system.


Blog
•
Schematic Compare
A design project doesn’t appear out of nowhere. The design process spreads over time, and project documents change. Schematic documents gradually become more complex, new functional blocks appear, and already finished parts can be modified and updated.

Blog
•
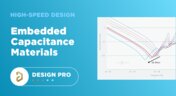
Embedded Capacitance Materials Overview
Capacitance is your friend whenever you need stable power integrity, which is why there is so much focus on decoupling capacitors. While these components are important and they can be used to provide targeted power integrity solutions to certain components, there is one specialty material used to supercharge capacitance in your PCB stackup or package substrate.
Blog
•
How To Import Libraries and Manage Components With Altium 365
The problems you can experience with components and libraries are endless. These problems are the most significant source of design issues and the biggest reason behind respins, costing companies untold amounts of lost profit annually.
If you want to have a better understanding of how to use Altium 365 to maintain a strong and centralized library that is free of problems and headaches, you may want to consider attending this lecture.


Blog
•
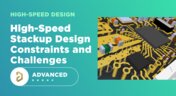
The High-Speed PCB Stackup Design Challenge
As much as we would like to build every high speed PCB perfectly, with ideal SI/PI/EMI characteristics, it isn’t always possible due to many practical constraints. Sometimes a stackup can be “good enough,” even for a high-speed PCB. This always comes from the need to balance engineering constraints, functional requirements, and the need to ensure signal and power integrity in a high-speed design, and finally to ensure compliance with EMC requirements.
On-Demand Webinar
•
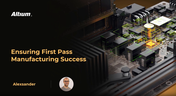
Ensuring First Pass Manufacturing Success
When it's time to release your project to your manufacturer, it's essential to ensure that all the necessary design aspects like assembly, BOM, and documentation are accurately and completely conveyed. Consistency is key to ensuring a successful release. Without clear release documentation, the designer faces increased risks of costly manufacturing response, time-consuming rework, or unintentional defects that can make it into the final product.
Blog
•
How I Improved My Collaboration Efficiency with Altium 365
Involving the whole team that will bring a product to completion early on in the development cycle is vital to efficient development. Design reviews with all the relevant parties are critical at each step of the design process, starting with high-level component selection, then through the schematic capture and PCB layout stages.


Blog
•
Countersink and Counterbore
Ergonomics and convenience are important issues when designing a printed circuit board and the device as a whole. A lot of Altium Designer tools are aimed at solving them. These include Countersink and Counterbore holes, which allow the use of various types of screws in the mounting holes of the board.

Blog
•
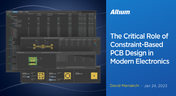
The Critical Role of Constraint-Based PCB Design in Modern Electronics
A constraint-based approach to PCB design is crucial in today's electronics industry. This article delves deeper into this complex and interesting topic, exploring various types of constraints, their advantages, and providing guidance on implementing them into your PCB design process.
Blog
•
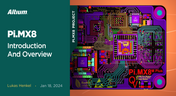
Pi.MX8 Project – Introduction and Overview
Do you have extensive knowledge about the Pi.MX8 module? We're excited to introduce a new series of articles focusing on an innovative approach to utilizing this module. In this inaugural chapter, we provide insights into the preparation for this project and detail the elements that will be used.

Blog
•
How to 'Shift Left' and Connect Procurement and Engineering? Altium 365 BOM Portal Step-by-Step
Learn why BOM management is critical for both procurement managers and electronic engineers. Altium 365 BOM Portal helps to bridge the gap between these worlds. Discover how!
Blog
•
Altium 365 Assembly Assistant: Available Now in the Altium Store
Happy New Year! 🎉 We are thrilled to announce that the Altium 365 Assembly Assistant is now officially released and available for direct purchase through the Altium Store.
Blog
•
Simple Documentation for Hand PCB Assembly
Creating documentation for hand PCB assembly does not prevent the same documentation from being utilized to assist in automated PCB assembly. Learn more about the optimal format for this data to enhance both your hand PCB assembly and overall assembly processes.
Blog
•
Constraint Manager: Precision in Every Detail
Explore the powerful features of Altium Designer 24! Experience Constraint Manager and revolutionize your PCB design with reusable constraint sets, schematic-to-board rule transition, easy class and differential pair grouping, and more.

Blog
•
Accelerate Last-Minute Design Changes with Altium 365
Curious about how to solve production blockers before they derail your product launch? Explore how Altium 365® can help you swiftly manage last-minute design changes.
Blog
•
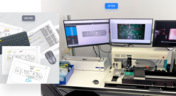
Design Phase – Lid Assembly Electronics Part 1
We are advancing our Open Source Laptop project to the next stage: assembling lid electronics. In the first part of this phase, we are focusing on the electronics and PCB design of the webcam module.
Blog
•
3 Common Challenges Stopping Your Production Line
The efficiency of production lines is crucial for any successful hardware product development. However, some challenges derail these processes. Do you face these problems, too? Let’s find out!
Blog
•
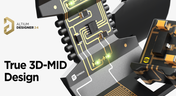
Explore New Possibilities with True 3D-MID Design
3D-MID technology seamlessly integrates electrical circuits with three-dimensional mechanical parts. This unique fusion of functionality unlocks a myriad of possibilities across various application areas. Explore more about this innovative feature, available in Altium Designer 24, to delve into the fascinating world of the 3D design process.

Blog
•
Strategies to Minimize PCB Damage
The PCB design process is always an exciting journey for a designer or the founder of a project. The first run of it can be breathtaking. In this article, we delve into strategies for minimizing PCB damage in the case of an exemplary circuit.
Blog
•
Fragmented Feedback Loops: The Hidden Cost in PCB Design and Testing
Explore the hidden impact of fragmented feedback loops in PCB design and testing. Check how minor communication gaps lead to significant financial burdens and learn how to address them.

Blog
•
Altium 365 GovCloud 101: Everything You Need to Know
Would you like to improve the protection of your data? Altium 365 GovCloud can help you achieve these goals. It’s a version of Altium 365, engineered to meet the stringent demands of US government regulations.
Blog
•
Design Phase – Lid Assembly Mechanics Part 3
We are heightening the anticipation for our Open Source Laptop project. In this chapter, we delve into the ambient light sensor module. Learn more about how to implement it into this project.

Blog
•
PCB CoDesign: Design Faster Together
Experience accelerated design collaboration with PCB CoDesign, exclusively available on Altium Designer starting from December 13th. This innovative feature adopts a collaborative approach by seamlessly integrating schematic and PCB design, enabling multiple engineers to work on the same project. Explore this cutting-edge feature on our newly launched page dedicated to its functionalities.

Blog
•
6 Steps to Accelerate the Development of Complex Products
Learn the key lessons from the presentation at Iteration22; “Joe Justice, Wikispeed - Everyone Must Be a Chief Engineer at SpaceX.” Read on and discover how to speed up the development of complex products.


Your search returns no results.